
Weekly Tip #12
How to Reduce Oversized PDF Files with Foxit Advanced Optimization Tool
One-click compression not enough? Foxit PDF Editor's Advanced Optimization gives you full control over size and clarity.
In our previous post, we covered Foxit PDF Editor’s one-click compression with three preset levels. However, many teachers and students have stricter compression requirements or high standards for image clarity, and basic one-click compression may not meet all your diverse needs.
That’s where the Advanced Optimization tool shines! This feature enables you to analyze file size distribution and apply customized professional settings for optimal compression results.
We’ll go through every module in detail and cover their definitions and functions step by step.
- Launch your oversized PDF in Foxit PDF Editor.
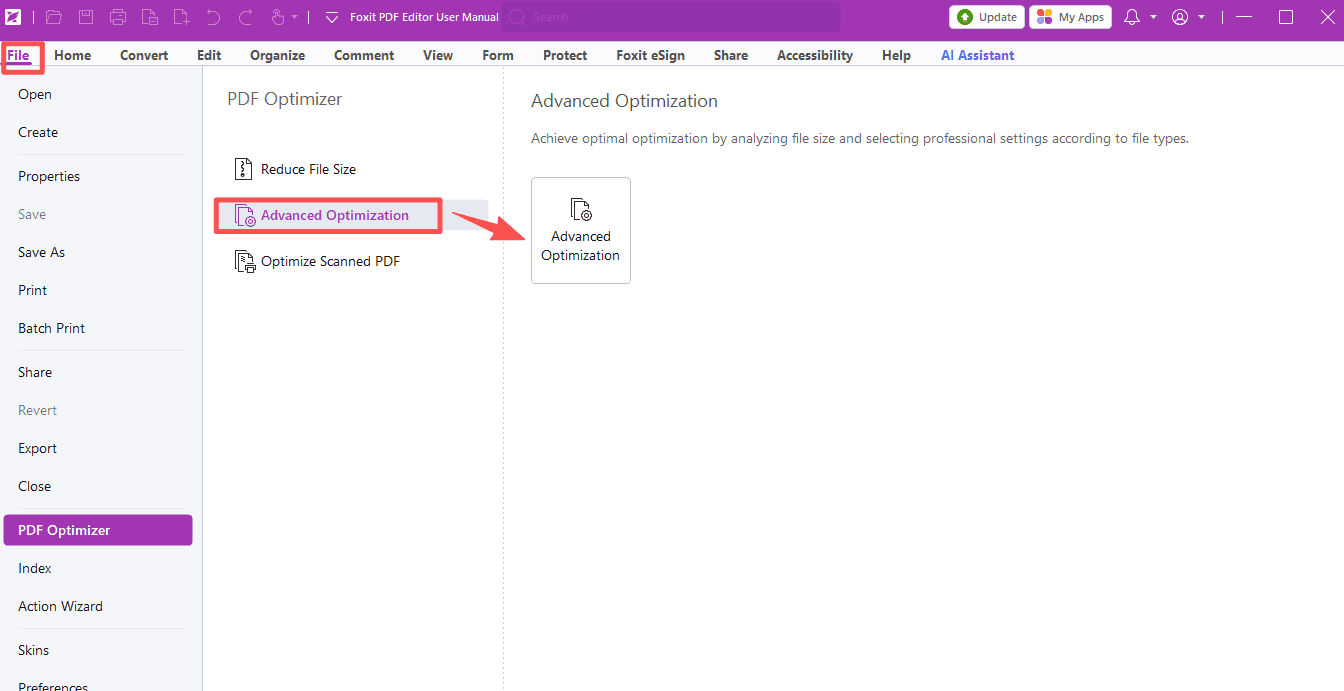
- Head to the top left corner: File > PDF Optimizer > Advanced Optimization > Advanced Optimization.
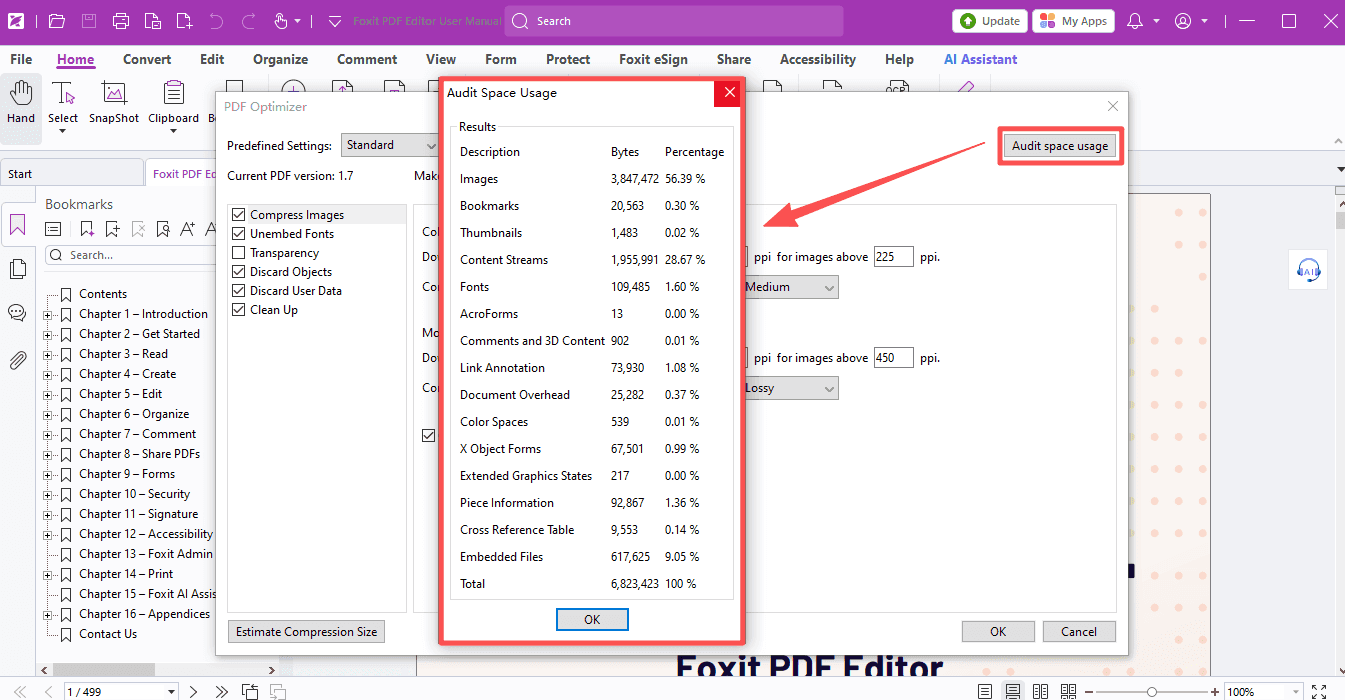
- Hit Audit Space Usage in the top-right corner to check which elements take up the most storage space in your file. For example, if images account for most of the file size, you can focus compression adjustments on pictures.
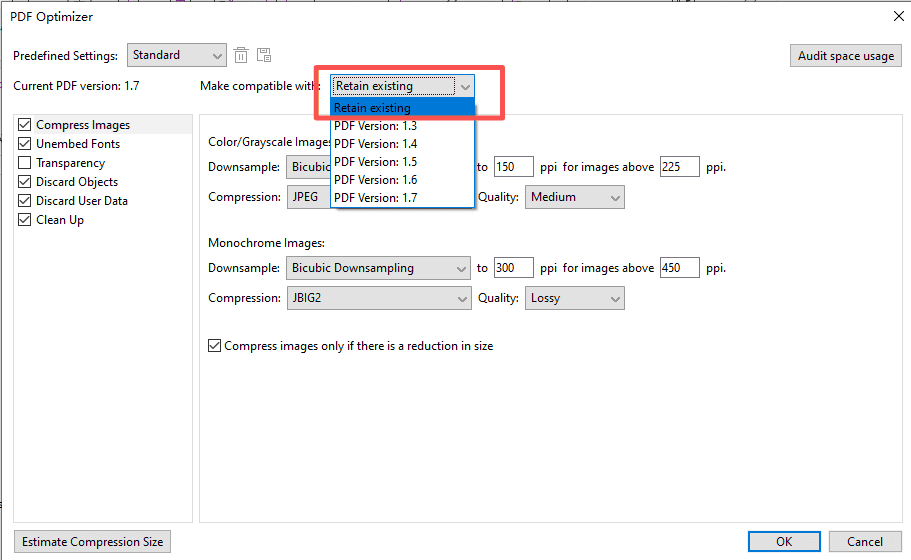
- Under the Make compatible with dropdown, we recommend selecting Retain existing to save your optimized file.
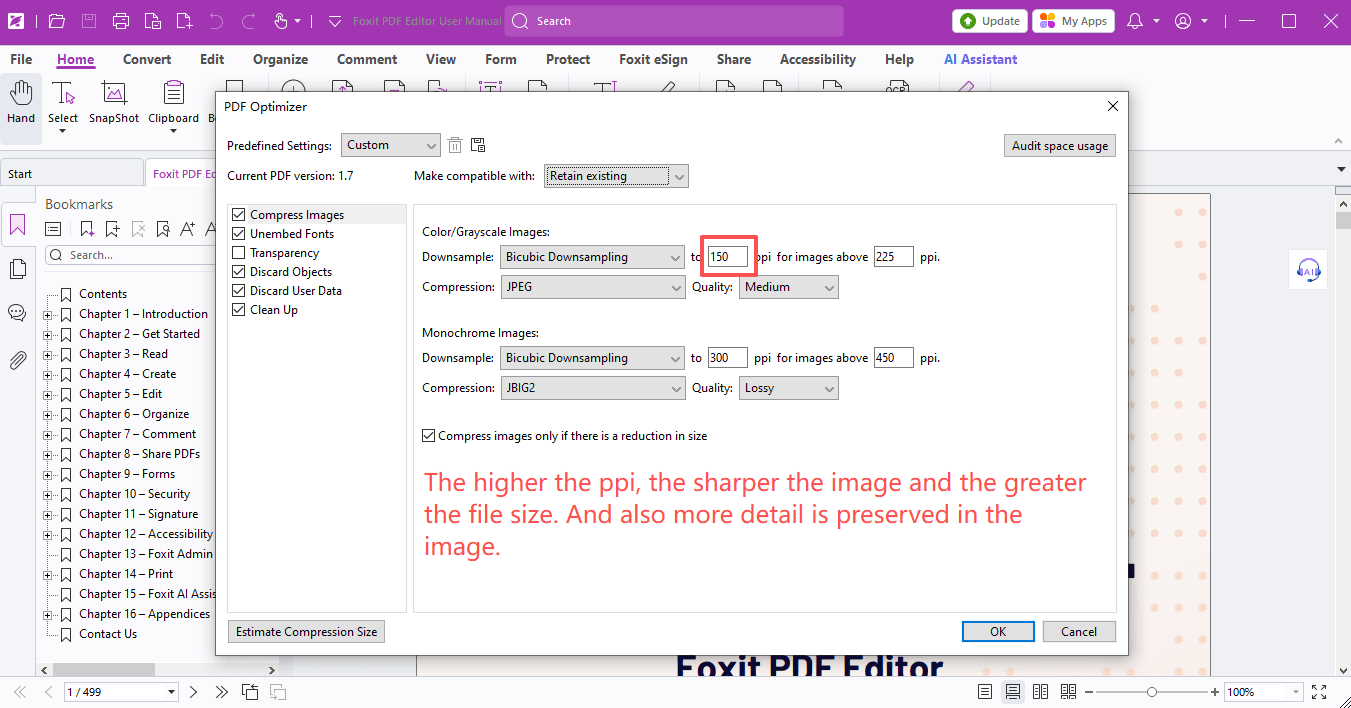
On the left sidebar, six modules control all compression settings: Compress Images, Unembed Fonts, Transparency, Discard Objects, Discard User Data, and Clean Up. Let’s break each one down!
1. Compress Images
This tab lets you adjust down sampling and compression algorithms for color/grayscale and monochrome images.
“PPI” stands for Pixels Per Inch, a unit measuring pixel density. Higher PPI delivers richer visual details but creates larger file sizes. If your space audit shows images hogging most space, lower the PPI value for stronger compression.
You may tick Compress images only if there is a reduction in size. With this box checked, images won’t be altered if your chosen settings fail to cut down the file size.
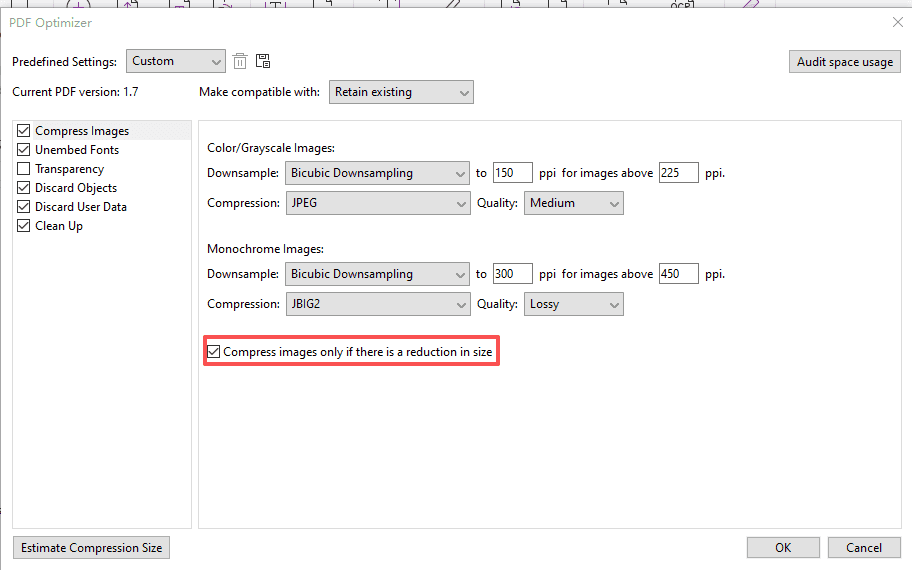
Click Estimate Compression Size at the bottom left after every tweak to check if you’ve hit your target file size!
Below is a detailed breakdown of every configurable option under Compress Images:
1.1 Downsample
Pick a downsampling method and set a target image resolution. For any image with a higher resolution than your set value, the tool will merge neighboring pixels to lower resolution to your specified number.
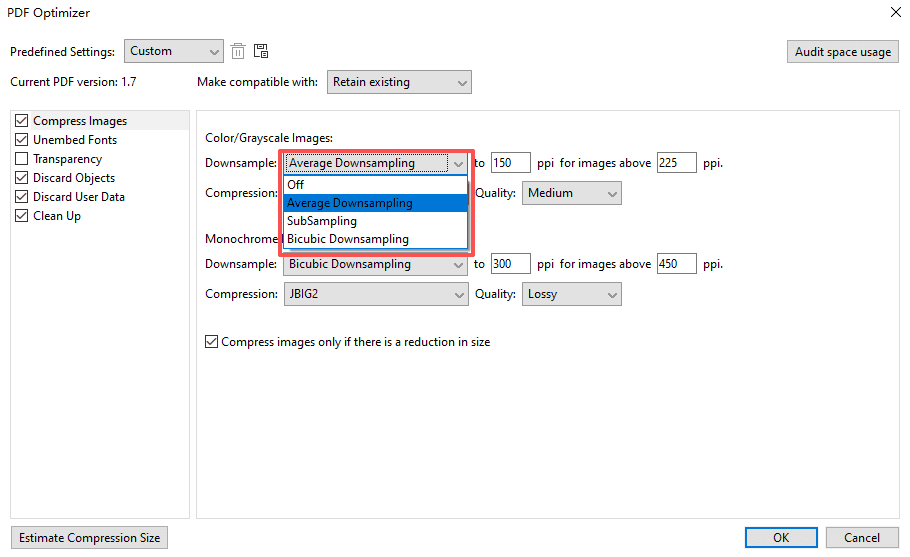
Off: Disables all downsampling functions.
Average Downsampling: Calculates the average color of pixels in an area, then replaces the whole region with this average color at your target resolution.
Subsampling: Picks one representative pixel from an area and replaces the entire region with that pixel. This method speeds up processing but produces less smooth, consistent visuals compared to other options.
Bicubic Downsampling: Uses weighted averages to calculate pixel colors. It takes longer to process but delivers much smoother color gradients.
1.2 Compression
Compression cuts file size by stripping redundant pixel data.
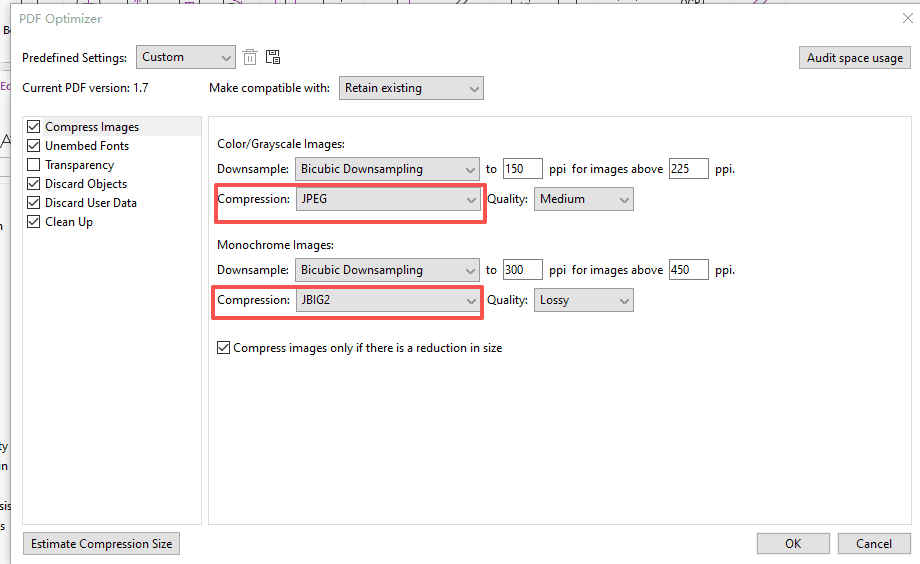
Match the right compression standard to your image type:
- Color & grayscale images: ZIP, JPEG, JPEG 2000
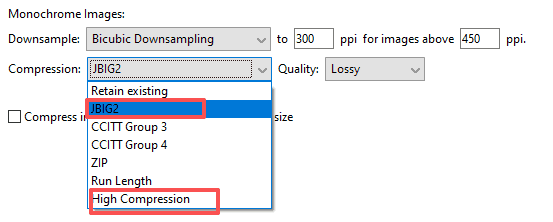
- Monochrome images: ZIP, JBIG2, CCITT Group 3, CCITT Group 4, Run Length
How to choose the best format:
- JPEG / JPEG 2000: Ideal for photos with smooth color transitions. JPEG 2000 delivers superior image quality even with lossy compression, and JPEG yields far smaller files than ZIP by discarding partial image data.
- ZIP: Perfect for illustrations with large solid-color blocks, repeating patterns, and patterned monochrome graphics.
- CCITT: Exclusively for monochrome bitmaps. CCITT Group 4 works well for most monochrome files, while CCITT Group 3 is designed for fax machines and compresses monochrome images one line at a time.
- JBIG2, Lossless / Lossy: Made for binary monochrome images, supporting both lossless and lossy compression. It outperforms CCITT for monochrome visuals.
- Run Length: Best for images with large pure white or black areas.
- High Compression: Compatible with nearly all images. Choose this if you prioritize minimal file size and can accept minor drops in visual quality.
1.3 Tile Size
Splits target images into separate tiles of your chosen dimension. Each tile compresses independently and can be decompressed separately. The default value 256 is recommended, and this setting only applies to JPEG 2000.

1.4 Quality
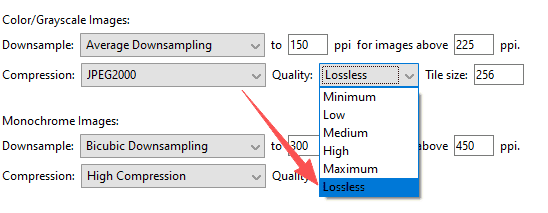
Adjust compression quality tiers (Minimum, Low, Medium, High, Maximum) for color and grayscale images under JPEG, JPEG 2000 and High Compression modes.
JPEG and JPEG 2000 are usually lossy formats, permanently removing pixel data and potentially lowering image clarity.
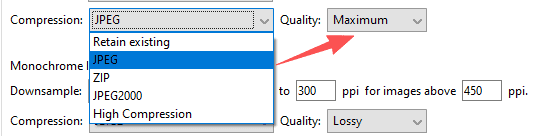
JPEG 2000 and JBIG2 also support lossless compression, which retains all original pixel data with zero quality loss.
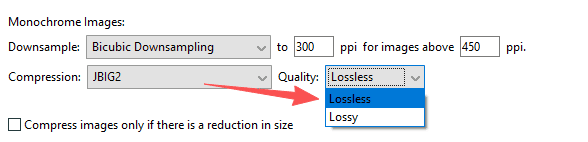
Most monochrome compression modes are lossless, except JBIG2 and High Compression.
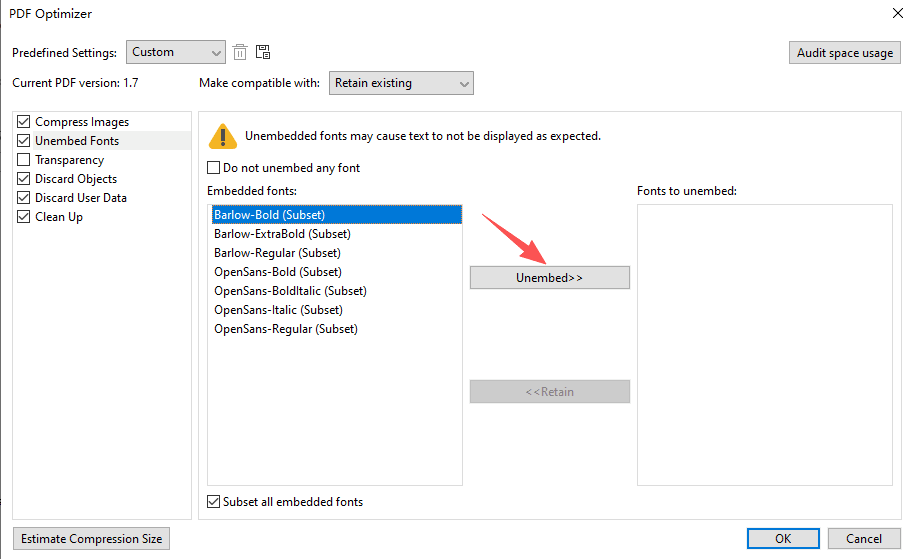
2. Unembed Fonts
Embedding all fonts guarantees consistent display across every device, so every viewer sees your document exactly as you designed it. If fonts are not embedded, PDF readers will substitute matching or default system fonts, which may distort your original layout.
If minor layout shifts are acceptable and you want to shrink file size drastically, you can unembed fonts:
- Select one or more embedded fonts from the list, then click Unembed >> to move them to the Unembedded Fonts list.
- Tick Subset all embedded fonts if you only want to embed the specific characters used in your document, rather than the full font file.
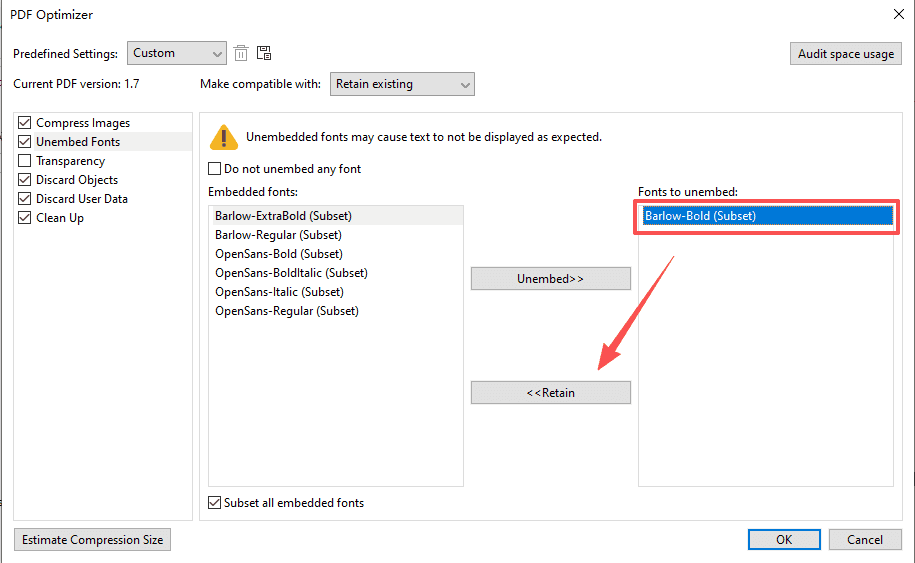
- If you accidentally unembed a font, select it in the Fonts to unembed list and hit Retain to re-embed it.
3. Transparency
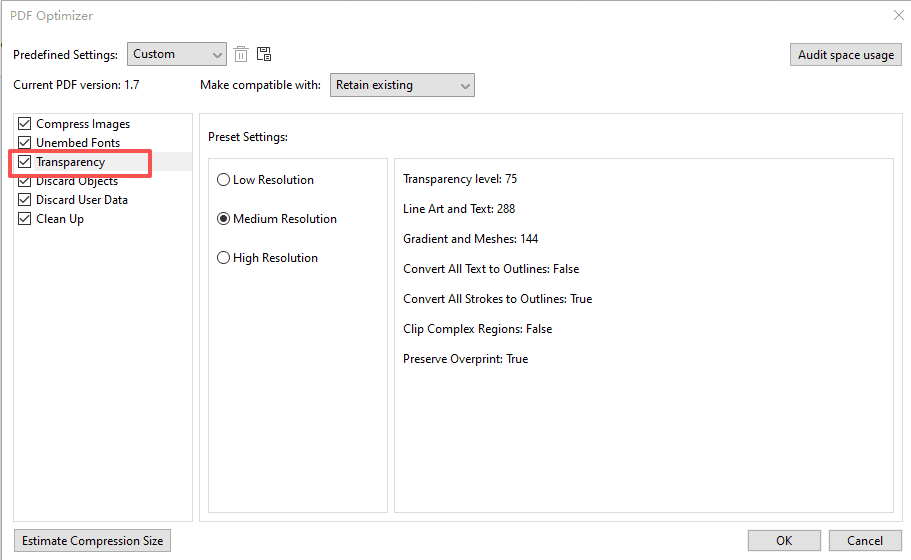
If your document contains transparent elements, use the preset options here to flatten transparency layers and reduce overall file size.
4. Discard Objects
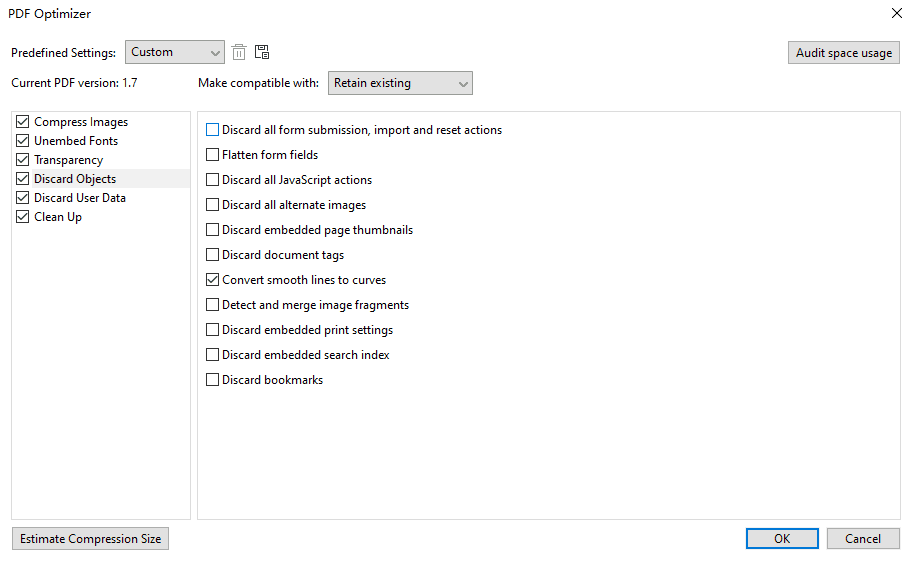
This tab lists removable PDF objects to cut file bloat:
- Discard all form submission, import and reset actions: Disable operations tied to form data submission, import and reset, while keeping the form fields themselves intact.
- Flatten form fields: Lock all forms so they can no longer be filled or edited. Only elements visible with the Hand Tool will remain, converted into static shapes.
- Discard all JavaScript actions: Delete every JavaScript script embedded in the PDF
- Discard all alternate images: Remove all extra image versions except the low-resolution copy optimized for on-screen viewing (high-res print-only images get deleted).
- Discard embedded page thumbnails: Remove built-in page preview thumbnails.
- Discard document tags: Erase all document accessibility tags (this may hurt screen reader compatibility).
- Convert smooth lines to curves: Transform straight lines into curve shapes to reduce file size and speed up on-screen rendering.
- Detect and merge image fragments: Combine adjacent image pieces with identical properties into one single image object if over 25 fragmented pieces are detected.
- Discard embedded print settings: Remove saved print preferences like page scaling and duplex printing mode.
- Discard embedded search index: Delete built-in search indexing data.
- Discard bookmarks: Remove all navigation bookmarks.
5. Discard User Data
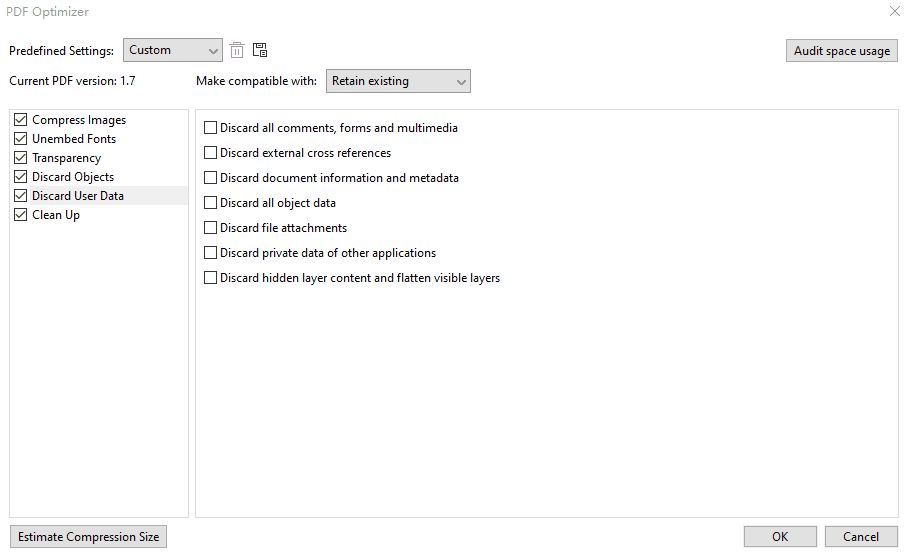
Delete personal or auxiliary data such as comments, attachments, layers and metadata:
- Discard all comments, forms and multimedia: Wipe all annotations, fillable forms and embedded media files.
- Discard external cross-references: Remove links pointing to other separate documents (internal links within this PDF stay untouched).
- Discard document information and metadata: Clear all data under File > Properties > Description and all metadata streams.
- Discard all object data: Erase custom user attributes stored in tag nodes.
- Discard file attachments: Delete every attached file, including files added as annotations.
- Discard private data of other applications: Remove leftover metadata from the software originally used to create the PDF.
- Discard hidden layer content and flatten visible layers: Erase all layer structures; all layers in the Layers panel will be permanently removed.
6. Clean Up
Clear redundant, outdated objects from your PDF.
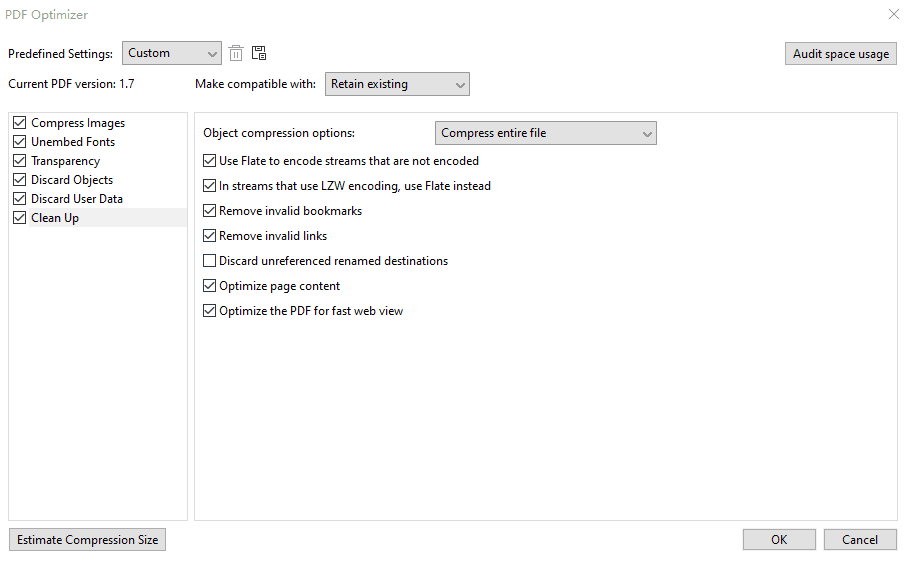
Some options may break PDF functionality, so the tool pre-selects only harmless items by default:
- Use Flate to encode streams that are not encoded: Add Flate compression to all uncompressed content streams in the file.
- In streams that use LZW encoding, use Flate instead: Convert all LZW-compressed images and content streams to smaller Flate encoding.
- Remove invalid bookmarks: Delete broken bookmarks that link to deleted pages.
- Remove invalid links: Erase hyperlinks pointing to non-existent targets inside the PDF.
- Discard unreferenced renamed destinations: Delete named locations that no internal element links to.
- Optimize page content: Strip redundant line breaks to boost Flate compression efficiency.
- Optimize the PDF for fast web view: Restructure the PDF for incremental web downloading, letting users read pages while the rest of the file loads online without waiting for full download.
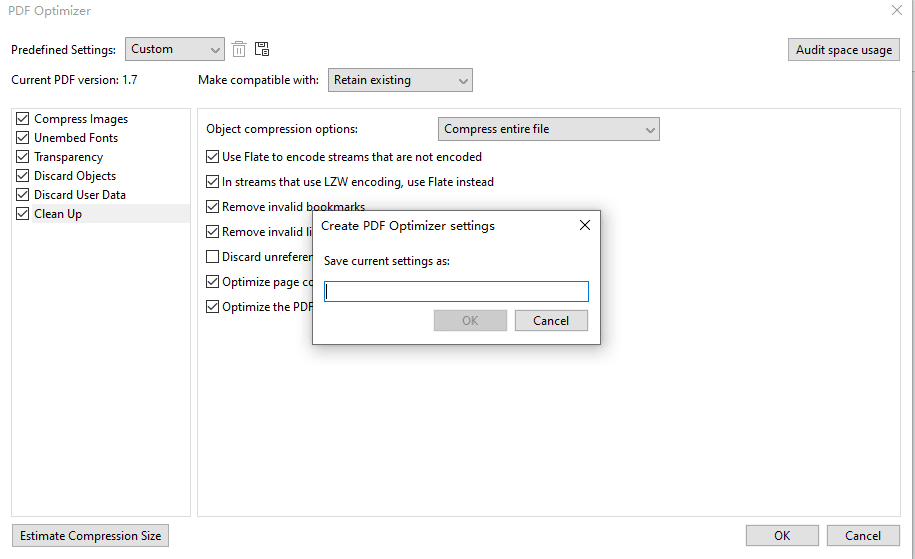
To reuse your customized optimization settings:
- Click the save icon at the top of the pop-up window.
- Name your custom preset.
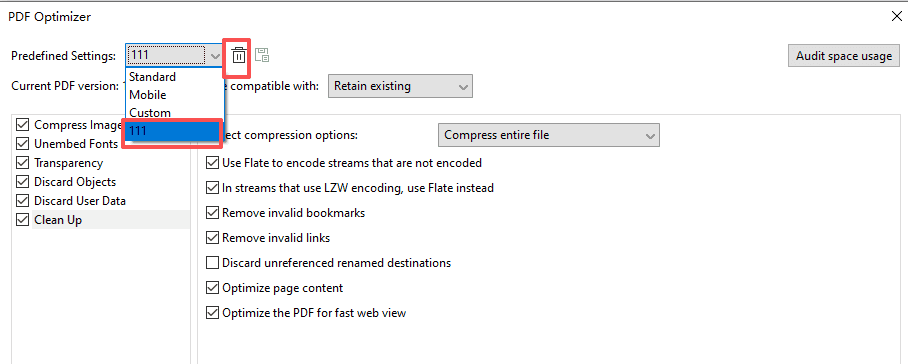
- Your saved preset will appear in the Predefined Settings dropdown menu at the top. To delete an old preset, select it from the dropdown and click the trash icon.
Finally, check the Estimate Compression Size in the bottom-left corner. Click OK and save your newly optimized, compressed PDF file!
That wraps up all the advanced PDF compression tips for today’s tutorial! Hope these practical settings make your academic and administrative documents much easier to handle.
If you need help with any specific case using Foxit PDF Editor, or have questions about how to use it, please feel free to click here to submit your inquiries. We will create dedicated guides based on your actual needs to provide further support.
Try it yourself
Open the interactive Web SDK demo, or talk to a Foxit APAC partner about licensing for your team or campus.